Saturday, December 8, 2012

Comfort Quilt for Bobbi

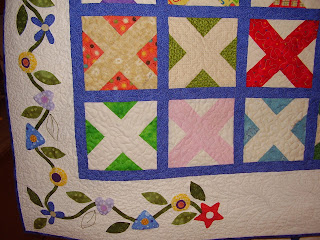
When we found out that our Foothills President had been diagnosed with cancer we decided we wanted to make her a comfort quilt. Our members donated "hugs" blocks and I had the honor of making them into a quilt.

With the number of blocks submitted I decided I could make a quilt of 6 blocks across and 9 blocks down without leaving any blocks out.  Well almost anyway - I was 4 blocks short.  So I decided to make a center block to make it work.  Since we're quilters, I decided on a little embroidered quilter girl, who was embroidering the word "hugs".

Next I thought about what could work for the borders.  I found a picture of a quilt with an applique border that I thought she'd like.  I made the wimsical flowers in the bright fabrics that she prefers. Then I thought that I really didn't want a full border of flowers because I wanted to leave some open space for qulting some feathers for her.  Lots of planning and decisions later, here's the finished quilt and some close-ups of the flowers, the center, and the quilted feathers.


Christmas Cookies


We had a cookie exchange at our Foothills Christmas Party on Tuesday.  I took and brought home 3 dozen cookies.  I tried some new recipes this year so thought I'd post them in case you want to try them.  The the Snowballs were delicious (if you like coconut), the Chocolate Pudding Cookies were just okay, but the Cottage Cheese Cookies were especially wonderful.

Snowballs 
1/2 cup of icing sugar
1/2 cup of butter
1/2 cup of shortening
1/2 tsp. of almond, vanilla, or peppermint extract
2 cups of all-purpose flour
1/2 tsp. salt
1 container of store purchase icing*
Coconut
Cream the sugar, butter, shortening and extract thoroughly.
Measure flour onto a square of wax paper, add salt, stir well to blend.
Add blended dry ingredients to creamed mixture, mix well.  Shape into 1" balls and place on an ungreased cookie sheet.  Bake at 400 degrees for 8 - 10 mins.   Cool on cookie rack.
Dip tops into thing icing, then into the coconut.  Makes 4 dozen. You can add food coloring to the icing for a more festive look! 
*make your own icing: ¼ c. butter, 1 c. powdered sugar, ¼ tsp vanilla or almond extract.  Makes ½ cup.  Can add up to 1 TB milk if too thick.
 Chocolate Pudding Cookies
4 oz. pkg. instant chocolate pudding and pie mix (1 box)
1 c. Bisquick baking mix (or Bisquick light)
¼ c oil
2 eggs
Chocolate type chips for decorating (any variety)
Preheat oven to 350 degrees.  Put pudding mix & baking mix in a bowl.  Mix together.  Add oil % eggs.  Mix until dough forms a large ball.  Shape into ½” balls (I made mine into 1” balls).  Roll in powdered sugar.  Place on ungreased or on a parchment paper covered cookie sheet – about 2” apart.  Press your thumb in the middle of each to make a thumbprint.  Put chocolate chip in the thumbprint.  Bake for 5-8 minutes or until lightly browned (I baked mine for about 15 minutes because they were larger).  Cool and put into a covered container.  May need to add a slice of bread to keep soft.

Cottage Cheese Cookies
1 c. shortening
1 c. sugar
¾ c. brown sugar
1 c. cottage cheese
3 c. flour
1 tsp. baking powder
½ tsp. salt
½ tsp. baking soda
½ c. walnuts
Preheat oven to 350 degrees.  Combine ingredients.  Roll into small balls and roll in white sugar combined with colored sprinkles.   Put on greased or parchment paper covered cookie sheet.  Bake for 11 minutes or until lightly browned.  Cool and put into a covered container.  May need to add a slice of bread to keep moist.

---------------------------------------------------------------------------------------------
We had table favors at the Christmas Party.  My friend Laura makes homemade candies for them each year and this year decided to make fundge instead.  She made maple walnut fudge, and cinnamon fudge.  I said I'd help by making chocolate fudge.  Here's the easy recipe I used - easy  but delicious.

                Foolproof Chocolate Fudge

3 cups (18 oz.) semi-sweet chocolate chips
1 (14 oz.) can
Eagle Brand® Sweetened Condensed Milk
Dash salt
1/2 to 1 cups chopped nuts (optional)
1 1/2 teaspoons vanilla extract
LINE 8- or 9-inch square pan with foil, extending foil over edges of pan.
MELT chocolate chips with sweetened condensed milk and salt in heavy saucepan over low heat. Remove from heat. Stir in nuts and vanilla. Spread evenly into prepared pan.
CHILL 2 hours or until firm. Remove from pan by lifting edges of foil. Cut into squares.

Monday, November 12, 2012

Auntie Green's Garden Progress

I've made some progress on the center medallion for my Auntie Green's Garden quilt.


I selected the colors to fit in with our master bedroom.  It will make me so happy to have an applique quilt for our king-sized bed.  Of course, it may be a few years before it's finished but I'm having fun in the process.

Thursday, October 25, 2012

Auntie Green's Garden

For about a year I've been day-dreaming about making an antique quilt that I fell in love with the minute I saw it - Auntie Green's Garden.  I searched the internet to find the pattern only to learn that there wasn't one available.  I found a few possible leads but they all fell through.  One of the ladies I exchanged emails with suggested I try to draw the pattern myself.  I've been carrying that idea in my head for all of this time and finally decided to see if I could do it.  It's a large applique quilt so seemed like a challenge I wasn't sure I could handle.  Yesterday, I finally decided I'd give it a whirl and see if I could make it happen.  Here's my drawing of the center medallion and a picture of the antique quilt I saw and fell in love with.


My drawing of the center


The quilt that inspired me.

A reproduction of this quilt that I found on the internet.

Stone Soup Challenge

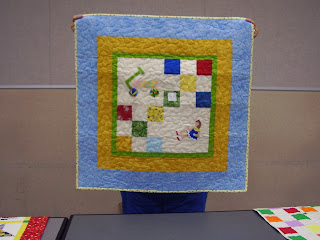
I've been program co-chair of our guild chapter this year (Foothills Quilters).  One of my responsibilities was to create the yearly challenge.  This year we did a "Stone Soup" Challenge.  What is that you ask?  Well, whoever signed-up to participate received a packet that contained an appliqued toy block, a 9-patch block, a nickel square, a fat eighth, and a strip of rick rack.  They were to use a recognizable piece of each item, add their own fabric, and create a quilt.  This year we coordinated the challenge with our charity chair, Mary, so had the gals make children's quilts.  I made up a few too many packets in anticipation of the challenge, so decided to turn them into quilts, rather than have them sit here as orphan blocks.  So, you guessed it, I made more than one quilt for the challenge.  Below are pictures of the appliqued toys that each person chose from, a picture of one of the packets, and the three quilts I made for the challenge.  Following those pictures, there are pictures of all of the quilts the ladies made for the challenge.  I was so pleased with the amount of participation.  What a fun time we had with this challenge!

Toy Blocks

Example of Packet


These are my three quilts:


These are the quilts the other Foothills Gals made:

Mary's

Patty's

Sharon's

Linda H's

Viola's

Jan's

Joan's

Mary Ann's

Louise's

Cheryl's

Bobbi's

Group Picture:

Wednesday, October 24, 2012

Twelve Days of Christmas

I've been wanting to make a Twelve Days of Christmas quilt for some time.  I discovered that my favorite applique' instructor, Arlene, was teaching a Twelve Days class.  Unfortunately, I joined the class when there were only a few blocks left to complete the quilt.  Not to be deterred, I decided to use the block patterns that I'd get during the last few classes, combine them with other patterns I'd been collecting, and with my own ideas.  Rather than make the twelve individual blocks they were making in class, I decided to put mine all together in one large center block.  There's a primitive wallhanging that I've always liked so decided to base my quilt on that layout (picture below).  I got on the internet for inspiration and ideas, thumbed through a few of my quilt books, pulled out a few of the patterns I'd been collecting for my "some day" quilt, and then started drawing on some freezer paper to see if I could make my vision happen (see below for my drawing).  I just completed the "swan a swimming" - now on to the "maid a milking".  Here's a picture of my progress so far.............


Here's my drawing............


Here's the quilt that inspired my layout (from Primitive Gatherings)................

Thursday, July 26, 2012

It's Finished - Home Sweet Home - Baltimore Album Style Quilt

It's time to celebrate!  My second Baltimore Album Style Quilt is finished.  Actually last Wednesday morning I completed the last few stitches on the binding.  My goal was to get it done in time to take to the Foothills Meeting.  It's always nicer when you can share a major accomplishment like this with your quilting friends.   I'm so pleased to have it finished.  Here it is................

Friday, July 13, 2012

4-Patch Posey for My Granddaughter

I've got the 4-Patch Posey bug so decided to make another one.

The 1 yard piece of fabric I found in my stash had the 4 repeats in just the one yard with about 6" left over.  I decided I'd make a small quilt with it and put the excess on the back to show how the original fabric looked before it was "kaleidoscoped". 

In the process of sewing it, my granddaughter mentioned that she wished she had a quilt.  She hadn't shown interst in my quilts for several years so I was pleased. 

Her bedroom set is the black lacquer look so thought this one might look really nice in her new apartment (she's moving in with a girlfriend in August).  However, with not nearly enough fabric to make a queen sized quilt, could I make it work?   I decided to use it as a design opportunity and came up with some alternate blocks to go with the posey blocks.

Since these are small block (the posey part is only 4"/4 1/2', sashed they are 6"/6 1/2"), it's going to take 130 blocks (13 rows of 10 blocks).   Here are 3 sample rows finished - I wanted to make sure I liked the look before I did the whole thing - there are lots of little pieces.


3 rows finished

Pieces and parts yet to sew

Tuesday, July 10, 2012

Home - Baltimore Album Style Quilt

Last week after I finished preparing the 3 projects for our upcoming Foothills meeting, I also decided to pull out a Baltimore Album Quilt I had started, and finish it.  The blocks were already completed so I had only the sashing and borders to do.  Made me wonder what I was waiting for.  I think the darling rabbit quilt I quilted for Joy inspired me to get busy and finish it so I could quilt some more feathers - I just love doing feathers.  Anyway, here's a picture of the top before I started quilting it.  When I'm finished with the quilting, I'll post another picture so you can see how I decided to quilt it (expect a few feathers).  The center block on this 9 block quilt is a depiction of our family home in Colorado.  Rick & I and the kids all loved that house and there were so many good memories made there.

I still need to decide on a name for this quilt.  Maybe something with "home" in it.  Ideas welcome.  The lettering in the last row reads, "Every house where love abides and friendship is a guest, is surely home, and home sweet home, for there the heart can rest."


Baltimore Album Style Quilt

Here are close-ups of the individual blocks:
Papercut with Flower Center

Paper Dolls


Lyre and Ruched Rose

Filligree Heart


Home Block


 Strawberry Wreath

Rose Wreath

Fleur de Lis with Poem

Fleur de Lis

Double Wedding Ring Class


I'm getting behind on posting again.  Last week I finished the sample for my upcoming Double Wedding Ring Demo and Class.  I decided to make a 3 ring table runner to demonstrate the method.  This pattern can be done in one step using raw-edge appliqued solid rings and quilt-as-you-go.  In the instructions I've  prepared I also included alternate methods so it can be done as traditionally as anyone would like. 

In this picture there are two blocks because the third one will be done during the demonstration.  This picture will give you an idea of how they'll look.

Saturday, June 30, 2012

4-Patch Posey

At the yearly quilting retreat I attend we had a class making a 4-Patch Posey quilt.  I started on my version and then it sat for two years.  I just wasn't happy with the sashing I had sewn around the blocks.  Fast forward to today.  We had a class at Foothills Quilters on how to make a 4-Patch Posey.  Yes!  I figured this is the perfect opportunity to pull out my unfinished project and get back to it.  I tore off the offending sashing and started fresh with different fabric for the sashing.  I got the top together and thought I was done.  But no - when I looked at it across the room, it just glared at me.  I could hardly stand to look at it.  So back to square one.  I tore it all apart again and tried one last time.  Now this new sashing feels just right to me.  Here's a picture of the finished quilt and a close-up of the sashing.  Note:  The border fabric is the fabric that is mirror cut to make the 4-patch blocks. 


Friday, June 29, 2012

Christmas Block of the Month-Old Fashioned Christmas

The top is now together with the Old Fashioned Christmas redwork blocks.  Now all that's left before the July meeting is to type the step-by-step instructions and I'm finished.  Hope the ladies like it.


Tuesday, June 26, 2012

Christmas Block of the Month - Traditional Christmas

The second half of the year, our Foothills group is doing a Christmas Block of the Month (BOM).  They'll have a choice of two different designs.   One is traditional Christmas and the other one is an old time Christmas.  I've had the red work blocks finished for a while but needed to put together the tops so I'd have them to show for the introduction to these BOMs.  I finished one this week, just in time for the July meeting when we plan to get it started.

Here's the traditional Christmas quilt:


Here's the old time Christmas quilt in process:


I need to finish it this week too because I have another project that is also due at the July meeting.  The inner ear/positional vertigo problem I've been dealing with for nearly 3 months has put me way behind.  I hate it when I have so much to do at the last minute!  But they're going together smoothly, so that makes me happy.  While I've been making them, I've been writing the step-by-step instructions and snapping photos of each step.  It should be a breeze to get them typed and made into a hand-out - if I can just read my scribbled notes, that is (grin).