Sunday, December 25, 2016

Merry Christmas!

Wishing you all good things for the holidays and blessings in the new year!
 
 
Here are a few pictures of Zahn (our great grandson) from this year.  He's such a blessing to our life.
 Recipe for fun-kids and water
Clothes-Pin Man


QUILTING TOOLS BLOCK OF THE MONTH

What was the block of the month for the Palo Verde Patchers Handwork Group?  In 2016 we made a Quilting Tools quilt.  It was a combination of redwork and fusible applique.  

Here are the ladies getting started on the Quilting Tools quilt.


Here's the cute quilt:


We also spent a little bit of time on several topics.  I taught writing and shading on quilts with Pigma Pens, Folding a Quilt so it Won't Crease, Preparing our quilts for the longarm quilter, and how to baste quilts using boards.  It was a productive year.  

Friday, November 25, 2016

Flowers Around My Cabin - Raffle Quilt for 2017

I finally completed the quilt I've been working on for months.  It's for my guild chapter's 2017 raffle (Foothills Quilters).


I'm so grateful that I was able to pass this off on Thanksgiving morning to the lady who is sewing on the binding. 

Back Story:  I quilted the quilt with an all-over feather meander in the center, small feathers in the red border, and outlined the applique, and then meandered around it.  I quilted this in mostly 2 hour stretches while my 2 1/2 year old great grandson was napping (on the days I wasn't so tired from chasing him around that I had to nap right along with him).

The ladies in Foothills made log cabin blocks for a quilt we donated to our meeting place.  I took the left-over blocks to make this raffle quilt (think left-overs = many blocks not true to size).  As you might guess, when asking for 12 1/2" blocks that will be 12" when finished, sometimes you get 12" blocks before they're finished.  That meant I needed to remake a dozen of the blocks to make them fit together.  We chose this star layout which I think is kind of unique and striking. 

I then gave a class on appliqueing an easy way (glue method), made kits for the ladies, and passed as many out as I could find takers.  After I collected them I made the ones that were missing for the layout I designed, and sewed them onto the borders.  Sewing them on took about 73 hours.  I missed a few session of keeping track so this number is conservative. 

Then I proceeded to figure out a design for the quilting and did some marking of the top.  Loading also took some thought because of the pieced backing, so I'm pleased that that turned out okay.  A lady in our group made the pieced back using several of the smallest blocks and I appliqued some flowers and leaves on it after I completed the quilting.

I decided on Dream Wool batting because the feather meander has some rather long feathers in some places and Dream batting can be quilted farther apart than what I had originally planned to use (Hobbs 80/20).  This quilt feels cuddly already with the wool batting in it.

After I completed the quilting, I realized it would need a hanging sleeve so we could display it on our quilt rack for the raffle.  So made that and a label that included laundering instructions. 

I was so pleased to hand it off just before noon on Thanksgiving.  Yea!

Here are some close-ups of the quilting and the back of the quilt:


Friday, November 18, 2016

"What I Love about Quilting" - red work quilting girls quilt

Here is the quilt I made last month for our Foothills Annual Quilt Challenge - the theme was "What I am grateful for about Foothills or Quilting".


I decided to use my little red work quilting girl blocks that had been languishing for about 9 years so it's a long-overdue UFO for me too.  I'm happy that they were right for the theme and are now made into a quilt.  The swag borders are pre-printed yardage.  I added hand applique bows at the corners.  It took a lot of calculating to make the pre-printed borders fit along the block edges evenly.  Thankfully trimming the blocks to a smaller size and choosing a good sashing width made it all fit together.

I did custom quilting on this quilt and it seemed to take half-of-forever (a total of about 62 hours).   I love quilting feathers and meandering, but struggle with ruler work, so was glad when that part was finished.  I put in some really long days getting this done on time - not what I want to repeat anytime soon.  We had been having our great grandson here so much, that I didn't think I'd ever be able to get enough time to finish it by the deadline, but it finally got finished.

Getting the marking out turned out to be a challenge.  I used Sewline pencil with pink lead and Bohin colored chalk, the purple.  I thought I had pre-tested them but not good enough I guess.  I'm going to have to be more careful in the future.

I plan to give the back a little bit more attention before I call this quilt completely finished.  It seems that when I was changing thread colors my longarm came unthreaded and I struggled getting it to sew evenly after I re-threaded.  The stitching looks okay on the front but there are some loops around some of the curved feather tips on the back.  I think I'll come up with an applique idea and do some back art to cover those "loopies".  I'll post some pictures when I get the back art finished. 

All in all, I'm pleased with the way it turned out, but I prefer a more leisurely experience when I'm quilting.  It's done though so now I can switch to doing a little bit of handwork - something I really enjoy.  A much slower pace too. 

Here are a few close-ups so you can see the quilting. 


Here's the back art:
 
. . .and a close-up


Tuesday, August 9, 2016

Sleepy Bear Quilt

I just completed this quilt yesterday.  I call it Sleepy Bear.  I plan to hang it over my gr. grandson, Zahn's, crib.  I had originally thought I'd give it to charity but he was so interested in the stars, the moon, & especially the ties, that I decided I would give it to him instead.


Here's the back....... .  I used muslin, which I often do to save $$$, and then use some of the left over quilt fabric from the front to machine applique something onto the back.

 
The top was made in 2012 - the backing was even finished and ready to go back then.  Then it sat around waiting until I got re-interested in it again.  I'm glad to finally get this UFO (unfinished object) finished.  If I recall correctly, I found the pattern for this little bear in one of my quilt magazines.

Tuesday, August 2, 2016

Friendship Star Prayer Quilt

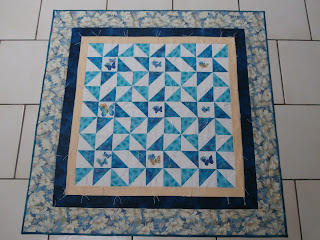
Here's the next quilt I've completed - another prayer quilt for the church. 
 

It's a friendship star variation.  I added machine appliqued butterflies in the center of each star.  This is the block I made for the first AZ Retreat I attended - for the block exchange.  I had a few extra blocks, so sewed a few more to add to them, and made them into a quilt.  The top has been languishing all these years. The church will say prayers over it as they tie the final tie on each knot.   I'm glad to finally have it finished and going to someone who it may comfort. 

Friday, July 29, 2016

Little Fishy Prayer Quilt

I'm working on finishing some quilt tops.  I made this blue and yellow-orange quilt top in 2004, and it's sat unquilted, and languishing in my cupboard. 

 
It has flying geese interspersed with fussy cut fish.   I've decided to call it Little Fishy.  It will be donated to the church where our quilting group meets to be used as a prayer quilt.  It's tied and the strings are left long enough that they can say prayers while tying the final knot.  I'm so happy to have it finished!
 
The other day my husband asked me what I was going to do with all of my quilts.  He suggested I try to find homes for some of them now, rather than wait for someone else to decide what to do with them when I pass on.  That was an idea I could get behind, and it's motivating me to finish some of them, and find good homes for them.  Our quilting group donates to both the church and a battered women's shelter.  I've gone through my tops to see what needs to be done to finish a bunch of them and donate them to one of these worthy causes. 
 
The backing is manatees. 
 
This is a quilt label I found on the internet.  I really like it and may use something similar.
 
This is the label I made to use for the prayer quilts - it's adapted from the above.
 
We hope this quilt comforts you, both spiritually and physically. The knots were tied while saying prayers to God.  Any loose knots can be tightened before washing to prevent them from coming out. Even if a knot comes out the prayer will last forever. Lovingly, Spirit of Hope UMC
 

Thursday, July 14, 2016

Comfort Quilt

Here is a comfort quilt I just completed:


If you read my blog, you've probably read where I mention little Zahn.  It's a long story which I'll just abbreviate here.  Zahn is my granddaughter's baby - 2 1/2 years old now - who was being raised by his other grandmother (who adopted him).  Unfortunately that grandmother has been fighting cancer and lost that battle last month.  Her partner, who also adopted him, is now raising Zahn.  This quilt is a comfort quilt for the partner, Bobbie.  She's a lovely person and we care about her so much.  She's doing a wonderful job raising Zahn and is very dear to us.  She just loved the quilt - she cried and cried when I gave it to her, especially when she read the label.  It reads:
 
When a loved one becomes a memory, the memory becomes a treasure.
 
 
I started this quilt in 2010 but didn't have anyone in mind for it then.  After Pattie lost her battle with cancer, I added the hearts on the front, and the back art heart bouquet, thinking I wanted to give it as a comfort quilt for Bobbie.


Quilts for the Church

We support two places at our quilting group, the church where we meet (we donate quilts to them) and a battered women's shelter (we donate quilts and pillowcases to them).  Here are two quilts I made to donate to the church.  The church use them as fund raisers, or to give as comfort quilts to the sick or needy, or to go to homeless senior citizens.  This year we hope to donate at least 10 quilts to the church.


These quilts were quilts I made previously just waiting for the right place for them.  I started the blue and yellow one in 2006 and the peach and green one in 2012 .  I'm so glad to finally have a home for them.  Now I need to get busy working on the two quilts I have in process for the battered women's shelter.  I need to put on borders and then quilt them.  I need more quilting time!  Sound familiar? 

Heart Quilt

At the guild chapter I attend, Foothills Quilters, we've been making heart quilts to give to those who have a serious illness or have lost a close loved one.  Here is the one I made and donated to give love and comfort to one of our ladies.  It's hand appliques using batik fabric on a black background.  I call it Framed Hearts:

 
I started it in 2005.  I love that it will one day give comfort to someone when they are sad.


Monday, April 25, 2016

Crazy Quilt Block Progress at the end of April 2016

I finished my last crazy quilt class on the internet by Kathy Shaw.  I miss it already.  It was such a great series of classes.  These 10 blocks are the blocks that I worked on during the latest class:


I thought I'd separate out the next 6 blocks though they are among the 10 that I also worked on  during this latest class.  They are blocks that were given to me by my friend Kathy E in February.  I've been working on them by embellishing them with motifs and such.


These are the 3 blocks that are completely finished.  I need to move some more blocks into this category.  They are lots of fun to make and also very time consuming.


Here are a few more blocks that I have started:


Sunday, April 24, 2016

Beaded Slips - the last task in my last Crazy Quilt Class - I'll miss these wonderful classes!

The beaded slip was another fun one to do.  I decided to give the process a good try and make 2 again.  The first one is a sea shell.  I used a piece of fabric as the pattern and 2 colors of beads.  I really like how this one turned out. 
 
Here are the steps.  I used a piece of fabric instead of a pattern, which I basted to a piece of muslin, and backed with stabilizer.  Then I hooped it and did the beading.  Then cut it out with a 1/4" seam allowance and turned the seam allowance over using Elmer's school glue.  Then I attached it to my beachy looking crazy quilt block.


The next beaded slip is a turtle.  I found him on a piece of fabric and decided to bead his shell and applique the head and legs as is.  I put him on the block with the teddy bear I made in task #2.
 
Here are pictures of the steps I used to make him.


Here he is on the block with the teddy bear. 
 
I'm sad that the crazy quilt classes are over.  I highly recommend Kathy Shaw's classes to everyone.  What a wonderful, creative, and well presented series of classes!